Sunday, April 7, 2013

Turn Signal Cam Repair - 1969 AMX

Today's piece du jour was to fix the turn signal canceling system which came to me broken when I bought the car in 2006. But first, I would like to enter into the maintenance web log record, some parts inventory that came in. Here are the 6 pairs of rear wheel brake cylinders that fit 1968-1974 AMC AMX and Javelins that are equipped with front disk brakes. CHOICEof25 Automotive Department picked them up for me on manufacturers clearance. 

Today I also did some troubleshooting on the Alt lamp. I temporarily swapped out the voltage regulator on the 1969 AMX with a known good specimen from the fleet's 1970 Javelin. There was no change. The Alt lamp still glows dimly when it should be off. I loosened tightened all the alternator connectors to clean them and it did not make a difference. I checked battery with a volt meter and it was a over 13 volts while running and then the voltage began to float down after the engine stopped. So, the battery is charging and I am not too concerned that I will get stuck with a dead battery. I will revisit this when I can diagnose it more thoroughly. 


The horn buttons were removed with 3 screws from the back of the wheel. I had to chase the wheel puller threads using my Uncle Jake's old tap kit that he bequeathed to me in 1985. It worked great. Luckily, Uncle Jake lived during the SAE era, so the tools fit my old cars. 

This is the GoldmanMotor's steering wheel puller in action. The totally cracked steering wheel is typical for these old AMC's. I have nicer steering wheels in-stock but this one is fine for my purposes. 


This photo was taken after I partially removed the guts for examination cleaning and lubricating. I couldn't figure why the turn signal was so squishy until I checked a used steering column that I had in the warehouse. It was from an AMX that I junked in 1985. I noticed that the spare column had a couple of springs that are missing from this car. 

Here is the old steering column that has been in my warehouse since 1985 and today vindicated me for never throwing out anything I've owned for the past 50 years. 

Those 2 metal spring widgets running horizontal near the lower part of the assembly near my thumb are the 2 pieces that were missing on the AMX. Those are the parts that make a turn signal lever click into position. 

Here are those 2 spring widgets transplanted into the AMX steering column. 

Here is the AMX parked in front of CHOICEof25 after using the new turn signal parts to automatically cancel the  blinkers when it turned into the driveway! 


Saturday, April 6, 2013

First Sortie - 1969 AMX

Today I knocked out a few maintenance items and then took the 1969 AMX on its first mission that wasn't strictly for its own service maintenance. 


I received a shipment of new radiator caps for our entire service fleet of Javelins. The old caps no longer held pressure. The Stant #10329 (13 psi) allowed the system to build pressure today and it is now an approved model to stock in our service inventory. The Javelins (including this AMX) are all running their original equipment AMC Blackstone radiators.


The AMX has been leaking a lot of oil through a weak gasket at the top of the timing chain cover. I tested for crankcase pressure by test driving with the oil filler cap removed and sure enough, the leak stopped. I figure the 85,000 mile compression rings are creating blow-by and I suspected that the oil filler cap vent is probably clogged - which would all result in the crankcase pressurizing. Crankcase pressure turns all the small oil leaks into large oil leaks. I removed the deteriorated clogged foam, sprayed it out with brake cleaner and then ran compressed air through it. We'll monitor the leaks and see how it goes. 


I received 6 pairs of Trico original equipment style wiper refills to try. It is very hard to determine the correct part number by shopping on the Internet because there is conflicting and erroneous information. I took a shot with these Trico #43-180 and luckily they are absolutely the correct ones and they are generally awesome. This is the correct part number for our entire Javelin fleet (1969-1972) and I believe they are correct for all Javelin and AMX 1968 - 1974. 


I checked the rear end lube and it was full and clean. I must have changed it when I received the AMX in 2006. 


I then checked the manual transmission gear oil and it was also full and fresh looking. Again, I evidently performed this maintenance when I bought the car in 2006. The car has been stored since then for future enjoyment - which is now!

All of the critical maintenance items that can prevent the car from destroying itself have now been completed.


The final maintenance drive was to take the AMX to AMVETS to puchase tapes for the car's factory 8-track tape player.

8-track tapes were 49 cents each at AMVETS.

Now the car was finally ready for its first sortie. I drove it to OldHouseDowntown and I gave the front lawn its annual Spring leaf/litter/booze bottle/cigarette-butt racking. 


And, I discovered that the car is the same color as the house! 


Squawk List:
Alternator idiot light slightly glows. 
A power steering seal is dripping. 
Directional signals don't cancel. 
Instrument lights are dead. 
Rear brakes need final adjustment, or auto adjustment. 
Passenger outer door handle inop. 

Thursday, April 4, 2013

Fracking Engine Oil. 1969 AMX


Bleeding Brakes - 1969 AMX


The clean part is the new brake wheel cylinder. 


My one-man brake bleeding outfit. Kit consists of an empty Snapple bottle, a rubber hose, and a mirror. Flashlight is used to illuminate the jar so you can watch the air bubbles as you pump the brake.

 
I have a whole shelf full of expensive complicated bleeding equipment and none of them work as good as this.


This is my Plan B. If I still see tiny bubbles in the jar while pumping the brake pedal, that means the bleeder screw threads are sucking fresh air back into the wheel cylinder. That is where this secret weapon comes into play. I pressurize the master cylinder with this cover that I equipped with an air fitting. Just 10 pounds of air pressure usually does the trick and I let a few more ounces of fluid bleed out of the wheel cylinder or caliper while observing that the fluid looks clean and bubble free. 


Monday, April 1, 2013

1969 AMX Rear Brakes

Today's piece du jour was to inspect the rear brakes on the '69 AMX. My original intent was to flush the brake lines with new fluid to remove any moisture absorbed while stored since 2006. At that time I had put rebuilt and sleeved 4-piston calipers in the front. I pulled the rear brake drums to inspect the brakes and discovered a weak seal on one of the wheel brake cylinders. The leakage was only noticeable by pulling back the boot. 


Minor brake fluid seepage is evident when the boot is pulled back. 

I also inspected the integrity of the metal brake line fittings to determine if the lines could be removed without destroying them. These are the original factory lines from 1969 and I prefer the extra trouble of saving them rather than simply reproducing, because I appreciate the originality. To loosen the brake line fittings on each wheel, I started by gently tightening them to break the treads free with less risk of rounding the hex head surface required when loosening. When they budged I then reversed course and loosened them enough to observe that the fitting was turning freely around the line - and not simply twisting and destroying the line. Then I tightened them back up for now so the fluid wouldn't be leaking all over the place and possibly damage the paint on a car that I park underneath the car rack. 


I stock a good supply of new parts for my fleet of Javelins. I had new rear wheel cylinders in stock. The same part number fits 1968-1974 Javelin and AMX as long as they are equipped with front disc brakes. I pulled the last pair from stock and reordered six more pairs from CHOICEof25.com so I can replace all four cars plus have another couple of sets. 


Next session I can replace the rear brake cylinders confident that all the bolts and fasteners are already loosened and that I have the necessary parts in-stock, ready to roll. 


Thursday, March 28, 2013

Foam Backed Headlining Fabric

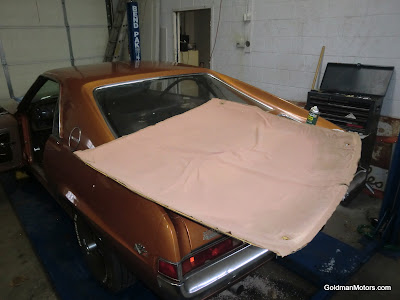
Droopy headliner from  the 1969 AMX

Today's piece du jour was to screw around with the removed droopy headliner from the 1969 AMX. I never gave these headliners much thought, despite the fact that I have an inventory of three more of them neatly stacked in my warehouse for my other Javelins. They are made of a rigid fiberglass molded foam board attached to, what turns out to be, a foam backed fabric. The foam fabric backing breaks down into a weak goo over the decades.

I found out on the Internet that foam backed fabric is common stuff. Who knew? Next installment I will either order some of this fabric online, or see if a local fabric shop carries it.


http://www.onlinefabricstore.net/specialty-stores/automotive-specialty-store/automotive-headlining/automotive-headlining-fabric/neutral-automotive-headlining-fabric-3-16-60-.htm

Wednesday, March 27, 2013

Headlining today's installment is the headliner.

While the 1969 American Motors AMX was stored, the headliner separated so that the fabric hangs down on the driver's (my) head. Today my piece du jour was to remove the headliner in anticipation of somehow gluing it back together for continued carefree miles. 

I found some water discoloration on the end near the windshield and I gently applied some automotive fabric cleaner from a can on my shelf that is about 35 years old. Next installment I will attempt to glue the fabric back to the molded-foam board. Perhaps a spray contact cement (if such a thing is available) will be suitable. 


'69 AMX's were equipped with reclining  "Saturday Night" seats. 

Note the awesome factory Hurst 4-speed shifter!
A prior owner must have set it up because it feels tremendous. 

Sunday, March 24, 2013

Piece Du Jour - Coolant Change 1969 AMX

Today I flushed out the remaining old coolant with clear water and observed that everything looks and sounds ok with the new water pump and power steering pump seals. I didn't see any leaks and the belts all line up perfectly with their pulleys. I was careful to keep these old belts facing their original rotating direction.

I let it run for about 20 minutes to bring it up to temperature. There are no mechanical noises in the engine but I can hear some "chugging" sounds coming from the steering pump/A.I.R. pump area. I'll check them with a mechanic's stethoscope one of these days. It is not a destructive sounding sound and it is not very loud.

My stock of coolant (one in the same as "antifreeze") is getting low so I ran over to Pep Boys to grab some. So today's twist is - that there are a whole bunch of different types and prices of antifreeze. You can buy green, or orange, or universal. You can buy premix or pure. You can buy major brand or no-name. You can buy 2 year, or 5 year, or lifetime.

Now, you are probably thinking that if a person goes through the expense of buying, insuring, storing, and maintaining a muscle car that the price of the coolant would be the last thing to worry about. But, what about the guy with more than one car? What if you are responsible for three? Or, ten - like me? Or, what if you had a choice of 25 muscle cars? In that case, the price really becomes more significant. Plus, do you want to stock and maintain an inventory of a million different types of antifreeze in your shop, or just a couple that will properly suit all your vehicles?

I will be discussing some of the antifreeze issues that I am currently researching and record them for future reference here - in the GoldmanMotors/CHOICEof25 maintenance weblog.

Today's test run of the 1969, 390 cubic inch AMX.


GoldmanMotors featured in Buffalo Magazine -The Man Issue

My garage is an article in today's Buffalo Magazine, written byBrenda Alesii.
It is an insert in the Sunday Buffalo News.